Working with the Nop Instant Search
Please read the following steps for more information on how to configure the Nop Instant Search
Working with the Nop Instant Search is as easy as configuring a few settings from the administration of the plugin. When the plugin is installed it comes preconfigured with default values for the settings
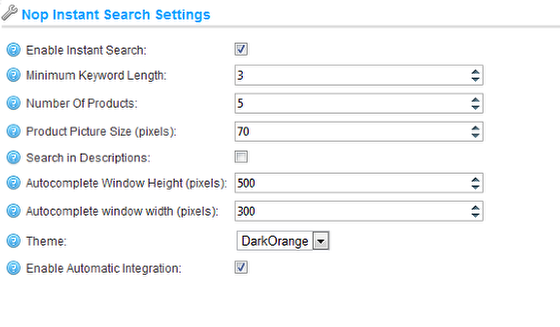
- Enable Instant Search -Sets whether the Instant Search is enabled. Even if you have integrated the plugin you can enable and disable it via this setting. The default setting value is false.
- Enable Automatic Integration - Sets whether Automatic Integration for the Nop Instant Search is enabled. Please refer to the Integration section for more information on the Automatic Integration option. The default setting value is false.
The following settings are System Settings and if you change some of them might require chanages in the styles of the plugin in order to look as expected.
- Minimum Keyword Lenth - this is the minimum number of characters that need to be typed before the instant search is triggered. Note that you can't make this lower that 3 and you can only increase the number otherwise the instant search might work extreemly slow. Actually the recommended setting is 3 or 4 and this is a number that a lot of the most popular shops are using.
- Number of Products - the number of products returned from the search. This is a way to limit the search result and show only some of the products. Note that if the number of products is more that the products that can fit in the autocomplete results window then a scroll bar will appear.
- Product Picture Size - This is the size of the pictures that are shown in the dropdown window. Note that by changing it you might need to also change the InstantSearch.css styles.
- Search in Descriptions - this option allows searching not only in the product name but also in the description of the product. Note that for stores with thousands of products setting this option can make searching much slower.
- Autocomplete Window Height (pixels) - via this setting you can control the height of the autocomplete window with the results. Note that if the number of products is more and can't fit in the window then a scroll bar appears. So you should try to keep the number of products and the window height in sync if you don't want a scroll bar to appear.
- Autocomplete Window width (pixels) - the width of the autocomplete results window. Note that by changing the width you might also need to accomodate the InstantSearch.css styles.
- Theme - the name of the theme for the plugin. There is a folder named Themes in the Instant Search plugin folder. The Theme settings points to the current theme folder. This way you can easily copy the default DarkOrange theme and rename it. Then you can change the styles and the images in the new theme folder and this way have a brand new look of the Instant Search plugin. Note that you need to reload the Instant Search Settings page in order for any new themes to appear in the Dropdown.